
Installing a Borla Cat-back Exhaust
This turned out to be a surprisingly easy install.
Listed below are the tools that will be needed to complete this job:
First of all, a comparison of the two exhausts. The Borla pipe diameter is the same as stock, you'd need a micrometer to tell the difference. But there are a few obvious things; it's mandrel-bent versus crimp-bent (check the bend just before the muffler for an excellent example of the benefits); the muffler itself is significantly smaller, as is the resonator.
On to the work. The first thing to do is to spray the rear bolts on the cat, and the mid-exhaust bolts with the WD-40 or PB Blaster the day before you are performing the installation. Several Probe owners have discovered that the bolts were nice and frozen over the years. I was fortunate, mine were amazingly clean and broke loose easily.
On the day of the installation, allow the car to cool for about an hour or so if it was driven to the location. Remember, exhaust gasses are hot!
For my installation, I secured the front tires and jacked the rear of the car as far as my floor jack would go, then jammed the jackstands under the chassis rails. This allowed enough room to crawl under and drop everything. A lift would have made it easier, but I liked free installation better and learned more this way.
 Now on
to the real work. To the right is the factory manual drawing of the exhaust.
We are removing #5 and #6–the muffler and resonator sections. There are
four bolts to worry about, the two rear ones on the cat (#9) and the two on
the flange between the resonator and muffler (#7).
Now on
to the real work. To the right is the factory manual drawing of the exhaust.
We are removing #5 and #6–the muffler and resonator sections. There are
four bolts to worry about, the two rear ones on the cat (#9) and the two on
the flange between the resonator and muffler (#7).
Hopefully these will come off without too much trouble. I have heard of people resorting to cutting the pipe. The shop manual suggests using an oxy-acetylene torch on the nuts to loosen them.
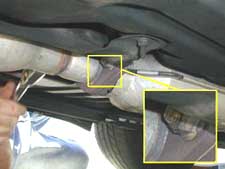
Here's what I found looking under the car after six years. Not too bad. They were soaked with PB-Blast the night before the install and the nuts broke loose almost immediately. The close-up (outlined in yellow) shows the location of the bolts on the catalytic converter. The bolts at the resonator will be identical.
Once you have the four nuts off, you need to pry the exhaust off the rubber hangers (#4 on the drawing, four places). See the pictures below to see the muffler hangers. I sprayed them with some WD-40, then carefully pried them off the exhaust pipe hangers with a large screwdriver. Be careful, you could poke it through your hand; they're a tight fit, so take your time. Once these are loose, it's just a matter of pulling the pipes out from around the rear suspension. Since my car was so low, I let the cat lay on the ground. There are no hangers on the cat, the first ones are before the flex pipe, and the next one is back at #8 in the drawing way after the resonator.
Now it's time to start putting the Borla in. I started at the cat and worked back. So, first thing is to bolt the Borla resonator section to the cat. This is also where I ran into the only problem; the flange holes were too close together, and Borla sent the wrong size gasket! For the gasket, I just left the old one until I could get a replacement. The flange required some mild surgery. A few minutes in a bench vise with a power drill solved the fit problems. The shop manual specifies to tighten the cat nuts to 71-88 lb-in (not lb-ft!)
Once the resonator is in, it's time to thread the muffler section through the suspension. A second pair of hands makes this much easier. Before sliding the two pieces together, slide the clamp from the kit on the resonator section. I discovered that there's a wide space in the heat shield that fits the bolt/clamp perfectly! Keeps things nice and neat. Leave it loose for now.
At this point, I hung the muffler and resonator sections back on the rubber hangers. Like with removing them, they require a little coaching. Avoid injuries, be patient.
Now that everything is hanging under the car, make sure it's all more-or-less where it belongs and make any adjustments. Line up the clamp so the edge is just short of the end of the pipe and tighten it down. I don't think you can really over tighten this since there's a metal spacer to stop the bolt.
 |
 |
 |
|
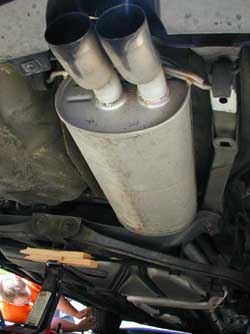
Stock exhaust
|
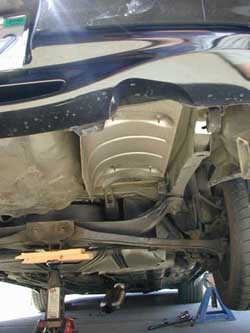
Nothing there!
|
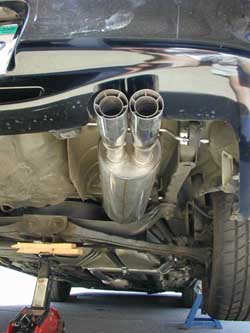
Installed Borla
|
Now you have gone from the picture on the left to the picture on the right. There's a lot of empty space under there now!
Start the car and make sure nothing is amiss. Now go for a test drive and enjoy the new growl! I've had it on for about a month as of this writing and the muffler has gone through the set-in stage. It's gotten deeper than when originally installed, with only a slight boominess under load around 2500-2800 RPM. There is no raspiness to the note at all, it just gets more "growly" near redline.
While the Borla is better looking, it's kind of a sleeper exhaust unlike the grapefruit-shooters, and I think the dual tips looks better with the car's styling.
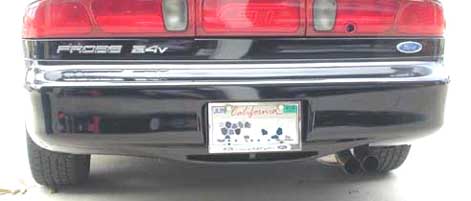 |
Stock look |
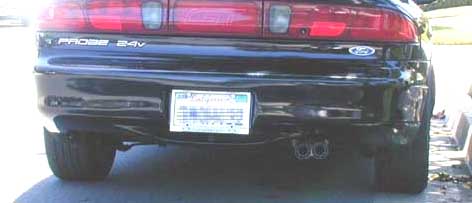 |
Borla look |
Text, information, and pictures by C. Laudermilk. Additional information and pictures from the 1995 Ford Probe Service Manual